Building a simple blog architecture
January 10, 2025
12 min read
Building your own self-hosted blogging platform is a rewarding feeling as a developer and a flexible way to yap online. As if there aren't enough places online to share your two cents you can never go wrong in having one that just belongs to you. This guide will walk you through setting up a markdown-powered blog using the the latest Next.js App Router.
I used the new NextJS app router to build my portfolio which houses a blogging architecture which converts a markdown document to a blog article. While NextJS's documentation is really good, I couldn't find documentation to build something straightforward so I documented how you can build something simple but really useful to setup your own blog.

Cons:
- There is no WYSIWYG editor, all your posts are going to be written in markdown. Markdown is a simple and versatile language that allows for easy formatting of text, images, and links. The markdown guide has really good docs to get started with markdown. Plus, markdown comes in handy in many areas of development.
Pros:
- Self-hosted
- No external CMS
- Easy to setup
Steps
- Create a new NextJS project
Start a new Next.js app using
npx create-next-app@latestSelect YES (y) when prompted to use the app router and Tailwind CSS.
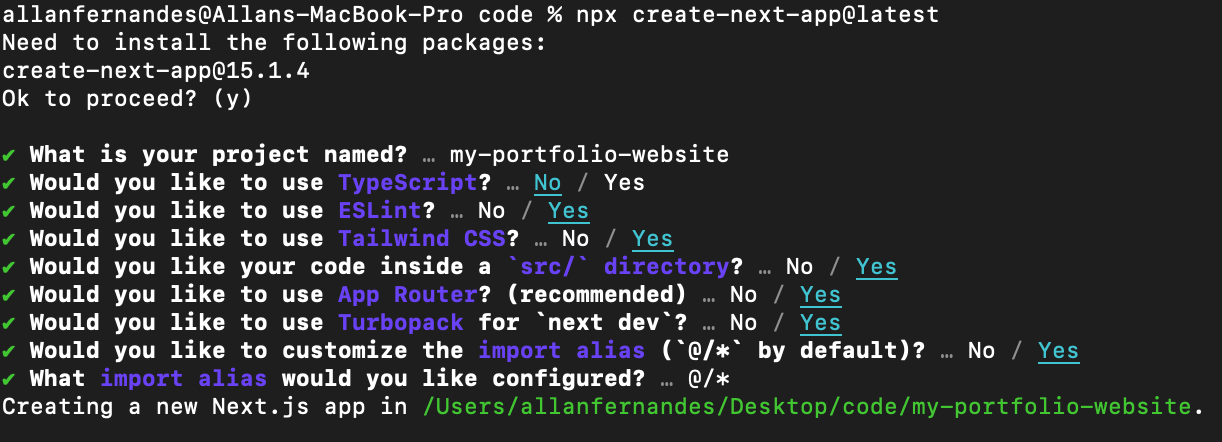
- Setup the homepage and navbar Clear all the boilerplate code provided by NextJS and replace it with how you would want your homepage to look, there are plenty of design inspiration websites out there but for the purpose of this article I’m going to be focusing on just the blog engine and so the content and styles are going to be kept very minimal.
<!-- src/app/page.js -->

export default function Home() {
return (
<main className="flex flex-col gap-2 items-center">
    <h1 className="text-4xl font-bold text-center sm:text-left">
        Welcome to my Website
    </h1>
</main>
)}
Rename your layout.js file to layout.jsx
<!-- src/app/layout.jsx -->
import Link from "next/link";
import "./globals.css";

export const metadata = {
  title: "My Portfolio Website",
  description: "Generated by create next app",
};

export default function RootLayout({ children }) {
return (
<html lang="en" className="dark">
<head>
    <meta charSet="UTF-8" />
</head>
<body className="bg-black antialiased">
 <header className="shadow-md text-white bg-teal-500">
    <nav className="flex justify-between items-center p-4">
        <Link href="/">Home</Link>
        <Link href="/blog">Blog</Link>
    </nav>
 </header>
<div className="max-w-2xl sm:mt-16 mt-4 mx-auto px-5 bg-black">
    {children}
</div>
</body>
</html>);
}
Your app should be looking something like this:

- Setup the blog page and dynamic routes
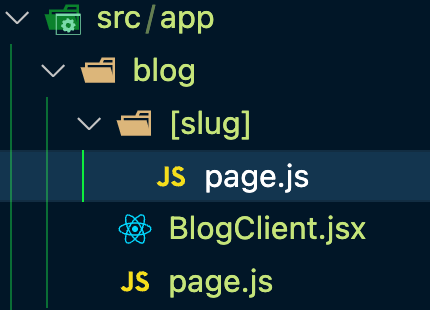
Since we're using the app router we need to create a Blog directory which is where all our blog content will reside
/blog.src/app/blog/page.js-This is the root page of the blog this is what users see when they are redirected to/blogSince NextJS renders the pages by default as a server component, we’ll create a client-side component on the same root calledBlogClient.jsxthis will actually be doing all of our heavy lifting on the blog page. And thepage.jsjust returns this react component. Create a subdirectory within the blog called[slug], this naming convention allows us to create dynamic routes in Next.js, which is what we will capitalize on to build our dynamic blogs.
Your folder structure should mimic the following:
- Creating your markdown blog posts
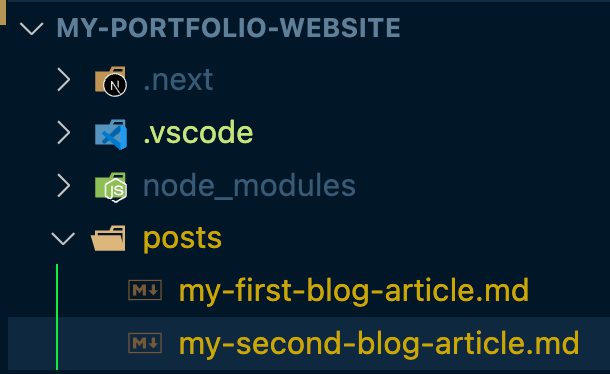
At the root of your project create a directory called
posts. This is where all our markdown blog posts are going to reside. Start by creating your first markdown blog postmy-first-blog-article.md
---
title: 'This is my first blog post'
date: '2025-01-03T08:57:28.969Z'
tags:
- life
- tools
summary: "I'm going to build all this to only write one blog post per year and call it a day"
slug: 'this-is-my-first-blog-post'
---
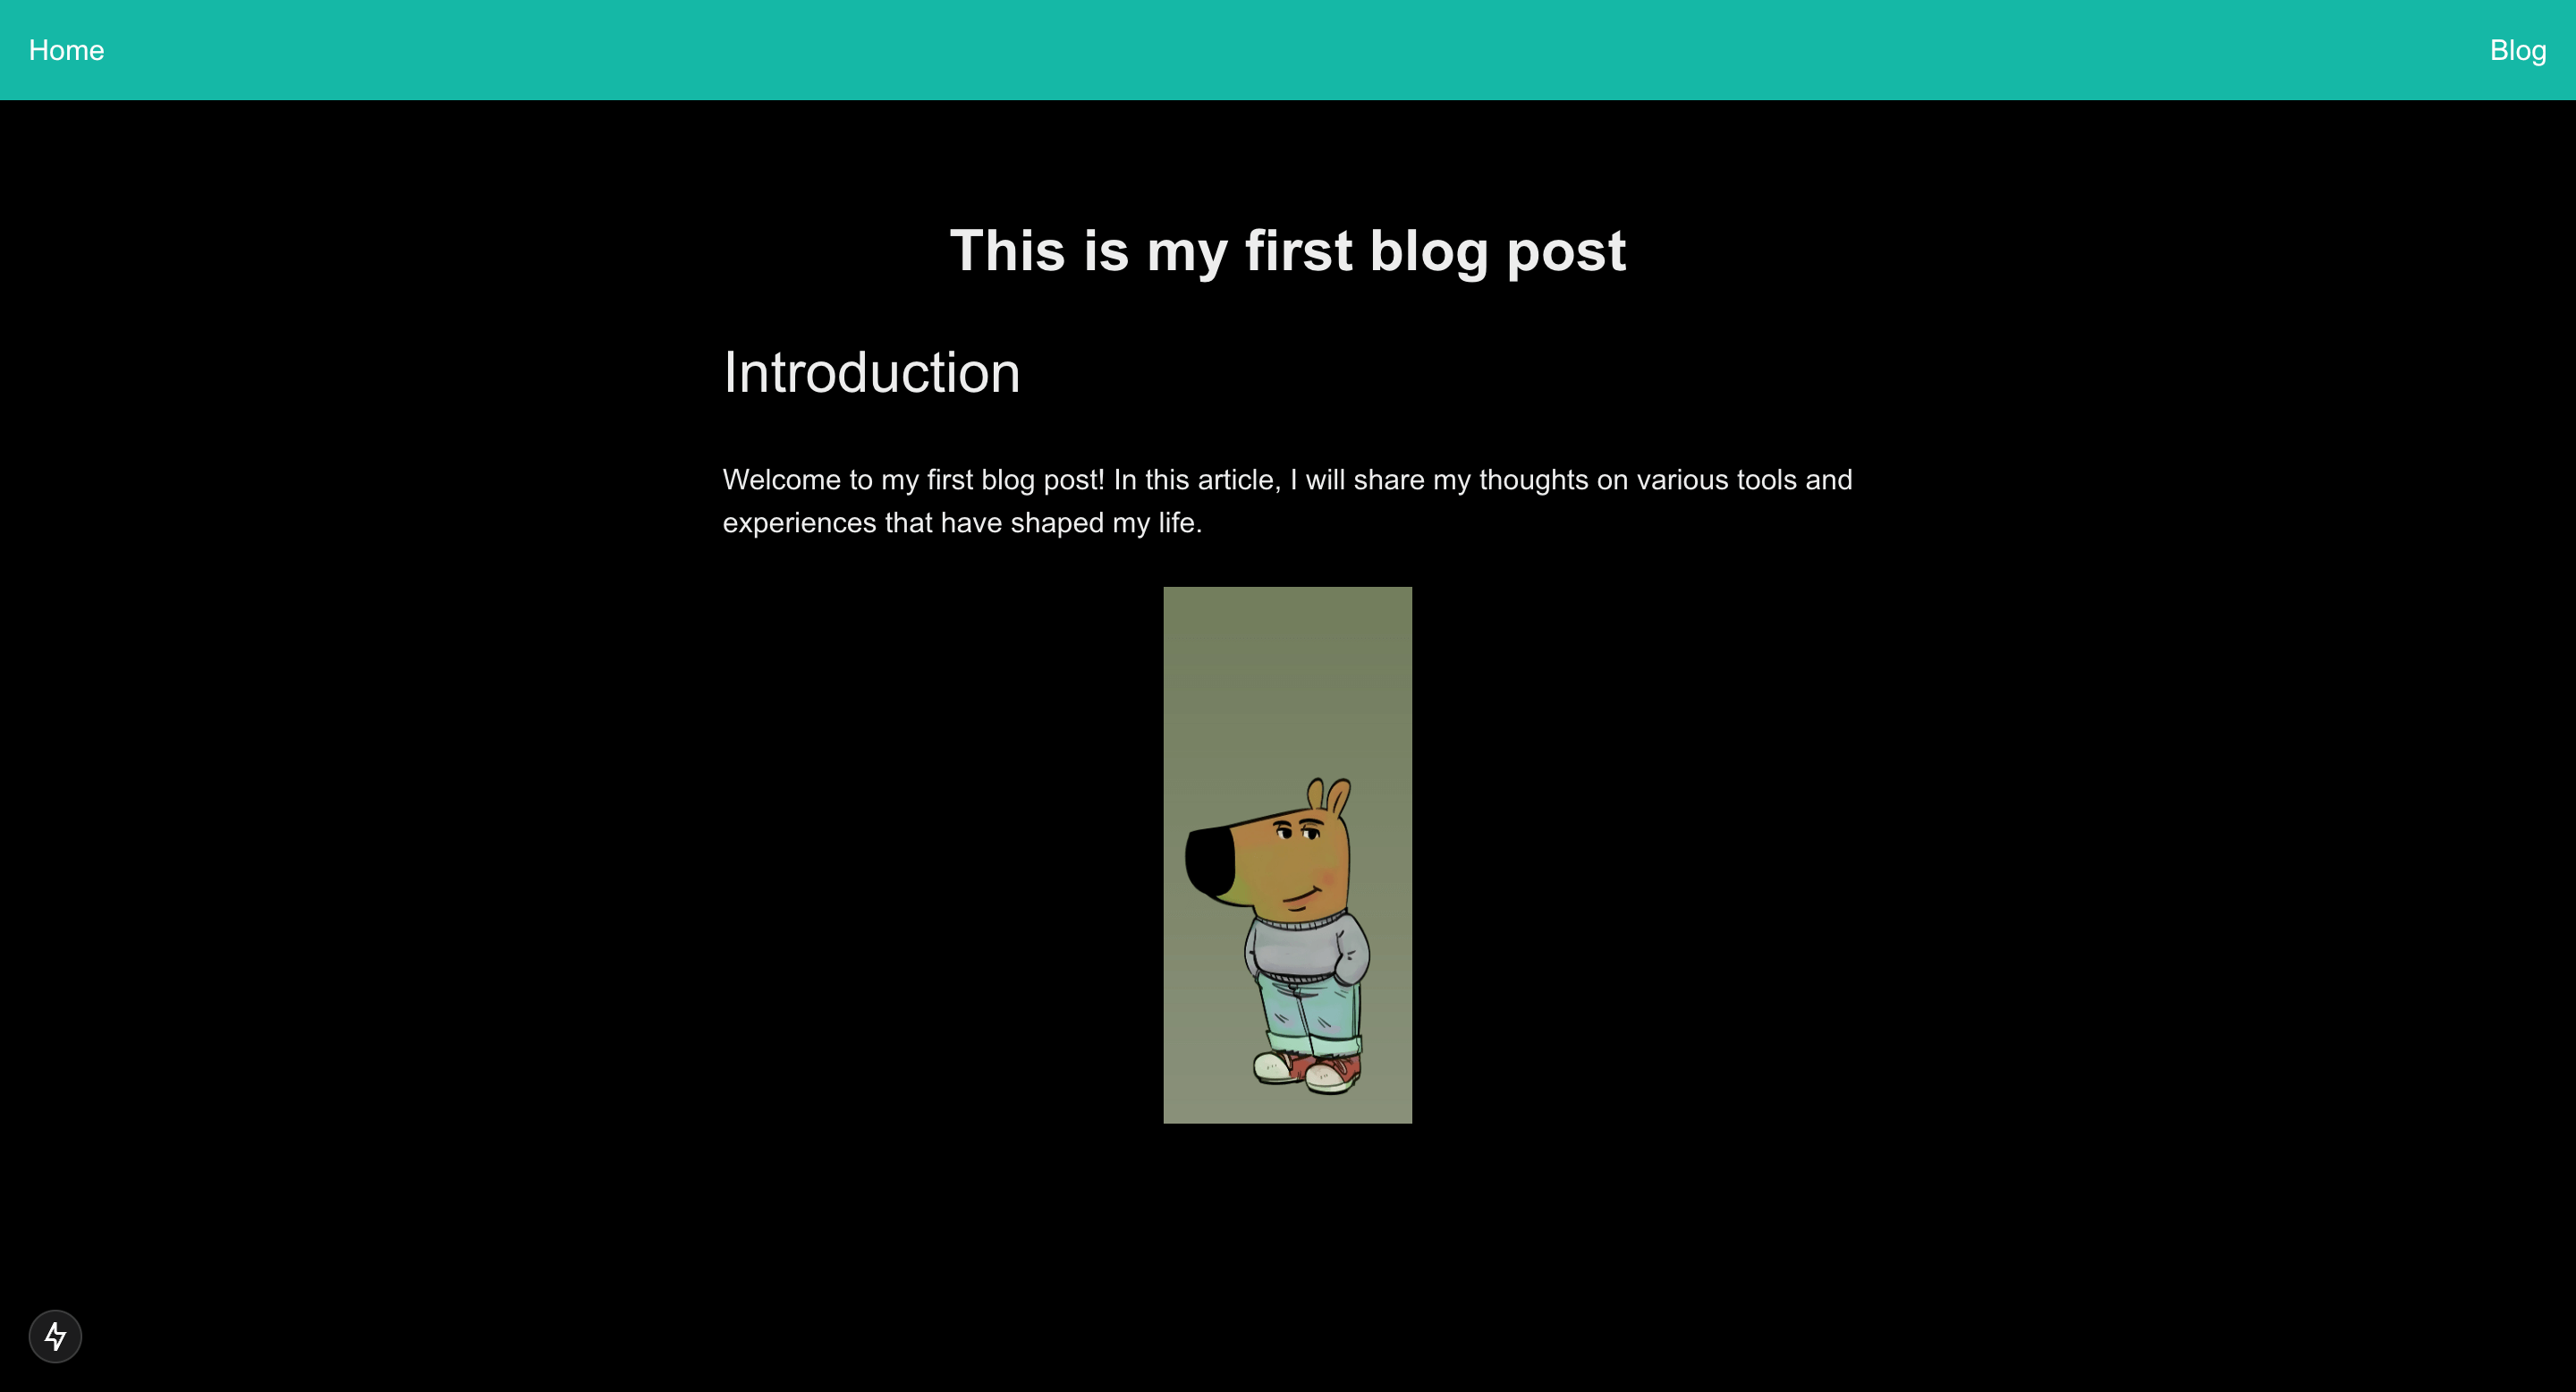
## Introduction
Welcome to my first blog post! In this article, I will share my thoughts on various tools and experiences that have shaped my life.

The text between the - - - dashes is called frontmatter, this is what will help us in adding the relevant metadata which can then be parsed.
The images for your blog article should be stored in the public folder.
Your folder structure should mimic the following:
At this point we have our blog articles ready in markdown, we’re 50% there, all we need now is to read through the file system and render these blog articles we’ve got in markdown using the respective slug in the frontmatter.
We'll need the help of the following three packages:
npm i gray-matter remark remark-html
Very briefly:
- Gray-matter: Helps parse the front-matter into an object we can work with.
- Remark: The processor that helps to serialize our markdown blog posts.
- Remark-html: Compiles the serialized markdown into HTML.
- Rendering blogs from markdown
In order to help us render all the blog posts we’ll create a helper file which will contain all the functions we need to return everything related to our blog posts.
Create a lib directory with the file
utilities.js
import fs from 'fs';
import path from 'path';
import matter from 'gray-matter';
import { remark } from 'remark';
import html from 'remark-html';

const postsDirectory = path.join(process.cwd(), 'posts');

/**
 * Retrieves and processes all markdown posts data from the posts directory.
 *
 * @returns {Array<Object>} Sorted array of post data objects, each containing id, slug, and other metadata.
 */
const getAllPostsData = () => {
    const fileNames = fs.readdirSync(postsDirectory);
    const allPostsData = fileNames.map((fileName) => {
        const id = fileName.replace(/\.md$/, '');
        const fullPath = path.join(postsDirectory, fileName);
        const fileContents = fs.readFileSync(fullPath, 'utf8');
        const matterResult = matter(fileContents);
        return {
            id,
            slug: matterResult.data.slug,
            ...matterResult.data,
        };
    });
    return allPostsData.sort((a, b) => (a.date < b.date ? 1 : -1));
}

/**
 * Retrieves the post data for a given slug.
 *
 * @param {string} slug - The slug of the post to retrieve.
 * @returns {Promise<Object>} The post data including slug, contentHtml, and other metadata.
 * @throws {Error} If no post with the given slug is found.
 */
async function getPostData(slug) {
    const fileNames = fs.readdirSync(postsDirectory);
    const matchedFile = fileNames.find((fileName) => {
        const fullPath = path.join(postsDirectory, fileName);
        const fileContents = fs.readFileSync(fullPath, 'utf8');
        const matterResult = matter(fileContents);
        return matterResult.data.slug === slug;
    });

    if (!matchedFile) {
        throw new Error(`Post with slug '${slug}' not found`);
    }

    const fullPath = path.join(postsDirectory, matchedFile);
    const fileContents = fs.readFileSync(fullPath, 'utf8');
    const matterResult = matter(fileContents);

    const processedContent = await remark().use(html).process(matterResult.content);
    const contentHtml = processedContent.toString();

    return {
        slug,
        contentHtml,
        ...matterResult.data,
    };
}

/**
 * Retrieves all unique tags from the blog posts.
 * @returns {string[]} Array of unique tags.
 */
const getAllTags = () => {
    const fileNames = fs.readdirSync(postsDirectory);
    const allTags = fileNames.reduce((acc, fileName) => {
        const fullPath = path.join(postsDirectory, fileName);
        const fileContents = fs.readFileSync(fullPath, 'utf8');
        const matterResult = matter(fileContents);
        if (matterResult.data.tags && Array.isArray(matterResult.data.tags)) {
            acc.push(...matterResult.data.tags);
        }
        return acc;
    }, []);

    // Remove duplicate tags
    return Array.from(new Set(allTags));
}

export { getAllPostsData, getPostData, getAllTags };
The getAllPostsData function runs through our posts directory, where all our markdown posts reside, and returns the id, slug, and the rest of the article metadata.
The getPostData function runs takes in the post slug as the argument and returns the markdown post as a HTML.
The getAllTags function is a replica of the getAllPostsData function, but I've created this specifically for rendering all the tags.
- Call helper functions and pass the return to the blog component.
<!-- src/app/blog/page.js -->

import BlogClient from './BlogClient';
import { getAllPostsData, getAllTags } from '../lib/utilities';

export const metadata = {
    title: 'Blog',
    description: 'A collection of blog posts on various topics.',
    image: '/og-image.png',
    url: 'https://myamazingportfolio.com/blog',
};

const BlogPage = async () => {
    const allPostsData = getAllPostsData();
    const allTags = getAllTags();

    return <BlogClient allPostsData={allPostsData} allTags={allTags} />;
};
- Render data to build blog page All we need to do now is use the data passed as props and render our blog page. The following is a simple snippet that renders the blog page with all the available tags and blog posts.
import Link from "next/link";

const BlogClient = ({ allPostsData, allTags }) => {

return (
<div className="container mx-auto sm:px-4 px-0">
<h2 className="font-bold sm:text-5xl text-3xl flex items-center justify-center">
    Blog
</h2>
<p className="sm:mt-8 mt-4 justify-center text-center">
    Incessant yapping about frontend, tech, hacks and life's nuances manifested in its
    textual form.
</p>
{/* Display All Tags */}
<div className="mt-4">
    <h3 className="text-2xl font-semibold mb-4">Tags</h3>
    <div className="flex flex-wrap gap-2">
        {allTags.map((tag) => {
            return (
                <button
                    key={tag}
                    className="text-black bg-white font-medium text-md rounded-lg p-2 mr-2"
                >
                    {tag}
                </button>
            );
        })}
    </div>
</div>
<h3 className="text-2xl font-semibold sm:mt-8 mt-4">Articles</h3>
{/* Display All Blog Posts */}
<ul className="mt-4">
{allPostsData.map(({ id, title, date, tags, slug, summary }) => (
<li key={id} className="blog-li shadow-md p-4 mb-6 rounded border-2">
    <div className="flex sm:flex-row flex-col justify-between">
        <h3 className="font-bold text-xl">{title}</h3>
        <p className=" sm:mt-0 mt-2">{date}</p>
    </div>
    <p className="sm:my-6 my-2">{summary}</p>
    <div className="flex sm:flex-row flex-col gap-2 sm:items-center justify-between mt-4">
    <div className="flex gap-2 items-center">
        <Link href={`/blog/${slug}`}>Read more</Link>
    </div>
    <div className="flex flex-wrap gap-2">
    {tags &&
        tags.map((tag, index) => (
        <span key={index}
            className="text-black bg-white font-medium text-md rounded-lg p-2 mr-2">
            {tag}
        </span>
        ))}
</div>
</div>
</li>
))}
</ul>
</div>);
};

export default BlogClient
Your blog page should look something like this
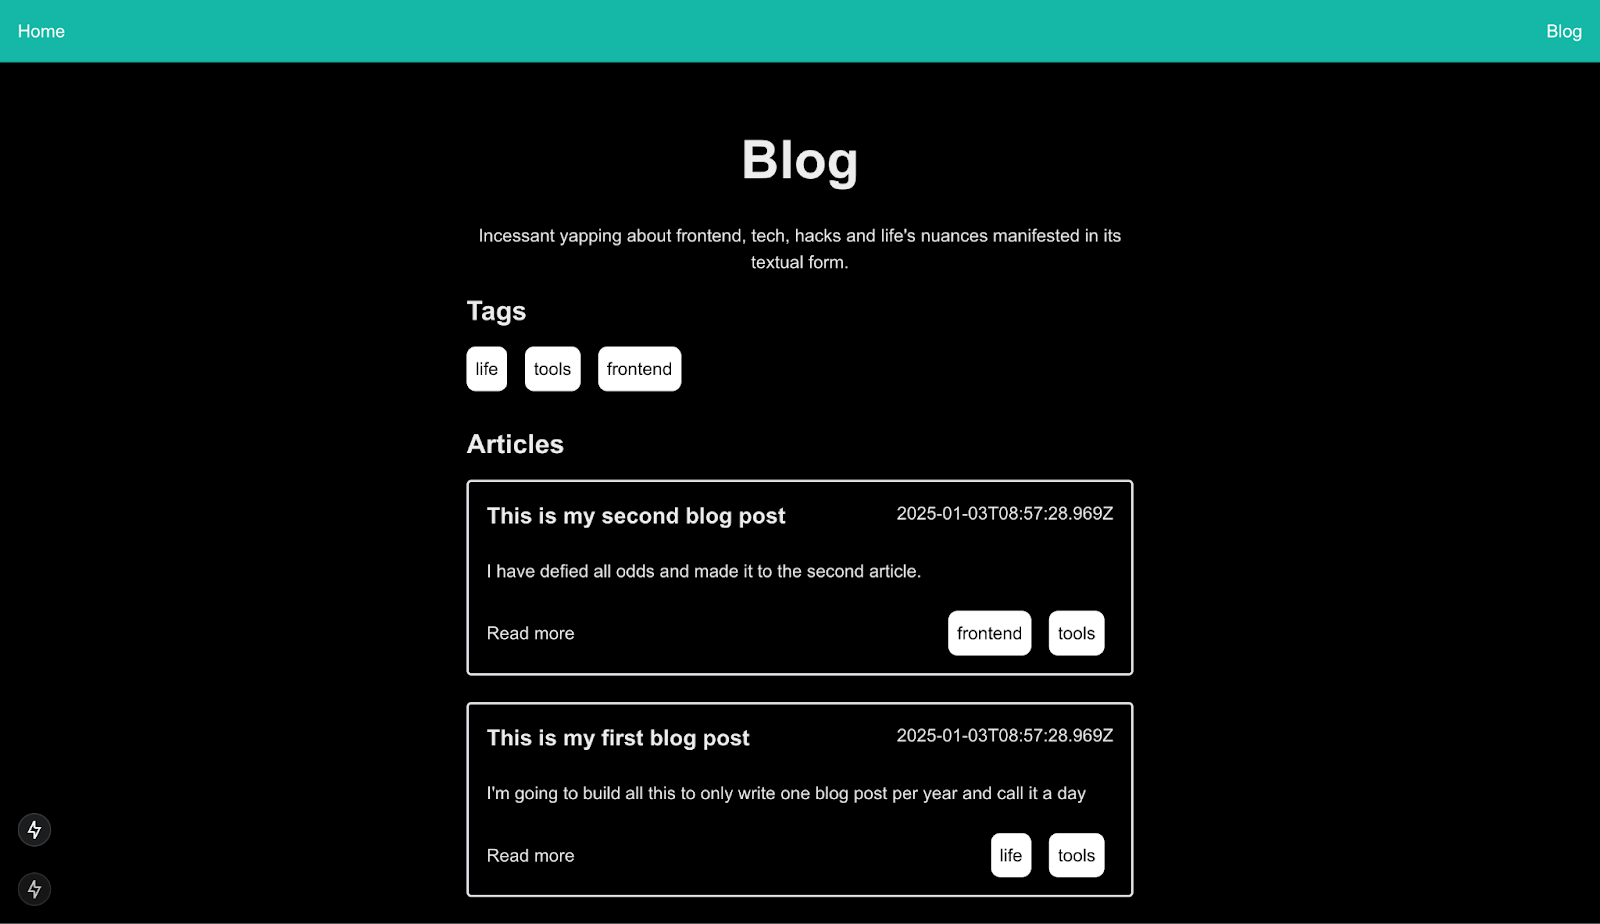 Clicking on
 Read more should redirect you to the dynamic slug, but our individual blog article is still static, so it won't render the content just yet!
- Render your blog article.
The final piece of the puzzle is the article.
import { getPostData } from '../../lib/utilities';

export default async function PostPage({ params }) {
const postData = await getPostData(params.slug);
return (
<div className="whitespace-pre-line	blog-article">
    <article>
        <h2 className="font-bold text-4xl flex items-center justify-center mb-6">
            {postData.title}
        </h2>
        <div dangerouslySetInnerHTML={{ __html: postData.contentHtml }} />
    </article>
</div>
);}
Your article page should now render your markdown content:
Congratulations! You now have a very simple but powerful markdown-based blog. The extent of customisation knows no bounds now that you have the base setup. I’ve used the same exact principles to build my own blog and built on top of it by adding filtering based on tags, implementing Social Share and setting up Open Graph tags that allow sharing of your articles on different platforms.
Check out the full project on Github and let me know how you’ve extended it to fit your needs.